The WISARD ArchitectureProfessor Igor Alexander at Imperial College London has used a different approach to creating his neural networks, the so called WISARD program (the name is based on the initials of the people who created it). It doesn't both with all those weights, back propagation or anything like that. Instead, it uses addressable memory slots. Discriminator ElementsConsider a very simple memory chip with sixteen memory locations, each of which contains either a 0 or a 1. I have represented them in this table, filling it with 1s and 0s randomly:
Because this memory has 16 elements, it can be accessed with a binary address of 4 bits, giving addresses from 0000 (which is binary for 0, i.e. the first slot) to 1111 (which is binary for 15, i.e. the last slot). The addresses count from 0 to 15, of course, rather than from 1 to 16. We call this simple memory a discriminator element, and like any memory, it can be read or written to. You specify an address and either read the 1 or 0 in memory, or tell it to write in a 1 or 0 as appropriate.
Networks of Discriminator ElementsConsider an image in an 8-by-8 square consisting only of binary pixels (i.e. the image consists of 64 spots which can only be 0 or 1). Four of these pixels, chosen at random, are chosen and are wired up as the four address bits of the discriminator element: 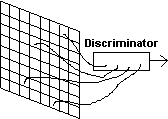 Since the pixels of the picture can be 1 or 0, the actual output from the discriminator element will depend on what the parts of the picture are that happen to coincide with the four pixels chosen to be the address bits. Of course, there is no reason why we should have to limit ourselves to one discriminator element. There are 64 pixels in the picture, enough to drive 16 discriminator elements, each with a 4-bit address. The image is split into groups of 4 bits, each picked randomly from the image itself, forming a tangled web linking the image with the 16 discriminator elements. All these together form one WISARD-style neural network, one discriminator.
A demonstration of a WISARD discriminatorThe following Java applet demonstrates a discriminator made from 16 elements, each the same format as in the applet above. This discriminator would form one part of a full recogniser - it would be used to recognise one particular input pattern (and variations of it). The input "image" is placed on the 8-by-8 grid to the left. Set the pixels of this pattern to 1 or 0 by clicking on them (each click alters the status of a pixel from 0 to 1 or vice-versa). Each of the discriminator elements derives its 4-bit address from 4 randomly chosen pixels in the image. There are no overlaps, so each of the 64 pixels is assigned to a different element. Whether the pixels are set to 1 or 0, they all specify a unique address in each of the elements. Altering the pattern in the image will select a different combination of memory slots in the elements. To get the discriminator to learn a pattern, create the pattern on the 8-by-8 grid, and then click on . You will find that one memory slot in each of the discriminators is set to 1. You can get the discriminator to learn other patterns as well - just set them up on the image and click on . However, the whole idea of a single discriminator is that it learns to recognise one single pattern. You should therefore only teach it one basic pattern and variations on it, for instance, the following: 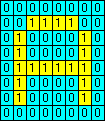
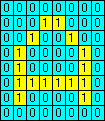
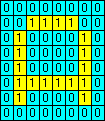
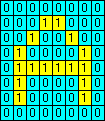
Having trained the discriminator, you will no doubt want to test it. Enter the test pattern into the grid, then click on . The outputs, 0 or 1, from each of the elements is displayed, and the total number of elements producing a 1 output is shown as a score. You may want to reset the discriminators to their untrained state. The icon will clear the discriminator memories. The icon will re-randomise the connections from the image to the 16 discriminator elements. JavaScript Source CodeI think it's time for a bit of JavaScript source code, don't you?
The variables xx and yy indicate the co-ordinates of the pixels in the 8-by-8 image which feed the address of each discriminator element, so the first address bit is xx[0],yy[0], the second is xx[1],yy[1] etc. Here's the code to initialise the discriminator elements, making sure that the xx and yy values point to random non-overlapping points on the image (I'll explain why this is necessary later).
Training the networkTraining the network couldn't be simpler. Firstly all the discriminator elements are set to 0 to indicate a blank sheet. You present each image (only once is necessary) to the web of elements, producing an address at each one of them. You then store a 1 in that location of each discriminator element, thereby instructing it to produce a 1 if it gets that address pattern again. This means that if the discriminator were faced with the identical pattern again, all the discriminators would produce 1 and the total "score" for that pattern would be 16 (1 from each discriminator). If a slightly different pattern were presented, some of the discriminators would match exactly and produce a 1, and some would not, so the total score would be less than 16 (how high depending on how similar the image was). If a totally different pattern were presented, fewer elements would trigger producing a 1, so a low score is produced. Images close to the original produce a high score, images different from the original produce a lower score - this is the reasoning behind the WISARD architecture. Here's the code to train the discriminator element. This function is particular to a given discriminator element, and, as I've created an object in the JavaScript code called discriminator_element, the function should be added to that definition. When training a discriminator (consisting of several elements), the function is called for all the elements making up that discriminator so that, between them, they store a 1 for the particular input pattern that's sitting on the grid at the time.
Running the networkTo distinguish between several patterns in a vocabulary, you would have a different discriminator (each consisting of 16 elements) for each one. For instance, if you were trying to recognise printed letters of the alphabet, you would have 26 discriminators. You would show the first one several examples of a printed letter A once each (to allow for slight differences in the letters) and let it train on them. Then you would show the second one several letter Bs etc. After the training patterns have been shown to the discriminators, they are faced with unknown patterns. The score for the elements in each discriminator is totted up and that tells you how similar the test pattern is to the pattern on which it was trained. The discriminator with the highest score wins. In our example, if you presented a pattern to the discriminators trained on the alphabet and they all produced scores of about 1 or 2 apart from the one trained on the letter K, you would assume that the pattern presented was a K. And here's the code that does the job:
Another function would be required that would call the firing() function for all the discriminators (remember, one discriminator - consisting of several elements - for each trained exemplar) and display the number of elements firing for each discriminator. The one with the highest number of elements firing, wins! (And determines which trained exemplar the network recognises for that pattern) Some answersWhat about larger images?If you had larger images, for example 12-by-20, then you would need more discriminators. Each one deals with 4 bits of the image, so the total number of discriminator elements in each discriminator is the total number of pixels divided by 4 (12 x 20 / 4 = 60 elements). Alternatively, you could make each element larger, for instance 32 locations rather than 16, which would require 5 bits of the image rather than 4. There are advantages in both methods, and usually a compromise is reached. Why are the addresses assigned randomly?Why not simply assign the first 4 pixels in the image to the first element, the next 4 to the next element etc. working down the columns? You could do this, and it would work, to a certain extent. However, it does lead to brittleness in the recognition. Consider these two patterns: 00010000 00001000 00010000 00001000 00010000 00001000 00010000 00001000 00010000 00001000 00010000 00001000 00010000 00001000 00010000 00001000 You could train a discriminator using the first pattern and test it on the second. It is clear that they represent essentially the same thing, but the whole of the middle two columns are different. If the elements were assigned down the columns, the score for the second pattern would be substantially lower (0 rather than 16). Randomising the connections from the elements to the input pattern tends to reduce this problem. Why not use a conventional neural network?The WISARD architecture has several distinct advantages over conventional neural networks:
There are disadvantages, of course:
|